
Fresh pasta cooks MUCH faster than store-bought pasta. It is also MUCH healthier, even than the whole wheat store-bought pasta, because none of the vitamins have had time to break down. To cook fresh pasta, bring a large pot of water (about 5 quarts) to a boil. I recently found out that you should use LOTS of water so that the pasta can move around and cook evenly. Add a little bit of salt (about a tablespoon) to the water as well to allow the pasta to absorb the flavor. Cook the pasta for 3-5 minutes. Check it after three minutes to see if it is done enough for your tastes. Pasta is a little healthier served "al dente" (this means it is less cooked and a little firmer).
Tomorrow, I'm going to give you a really cute 4th of July dessert idea. I'm going to take a break this weekend and enjoy my Fourth of July holiday...you should do the same!!!
Wednesday, June 30, 2010
The Correct Way to Make Pasta (with the Bosch)


Note: MY BOOK IS HERE!!! Please read the following posts about my book, shipping costs, etc.
This blog post is dedicated to those of you out there who either have a Bosch already or are considering purchasing one. I use my pasta attachment all the time. I had to take a class to find out how to do it correctly and if this little tutorial is insufficient...find a class to learn how to make pasta...it is fun, cool and healthy and really doesn't take much time at all!!!
First of all, before you assemble the pasta maker, read all instructions. Do not screw any of the parts on too tight or you will strip the threads...I found this out firsthand. Also, grease all parts of the pasta maker before assembly for easier cleaning.
To make the pasta, add all ingredients except the water. Using the whips, whip the dough and add water until the dough resembles popcorn or cracker jacks. At this stage, assemble the pasta maker and drop the dough into the pasta maker. Be careful not to add too much dough or it will jam up. Turn the machine on to a speed that you find comfortable and as the dough comes out, flour it and separate it. Cut it with a knife when it reaches the desired size. To cut it, put the knife flush with the edge of the machine and quickly slice downward, slicing the pasta quickly and crisply. With macaroni, this will be about an inch or so. Before you cook the pasta, shake off the excess flour.
Here is my family's all-time favorite pasta recipe. It is lighter than 100% whole wheat pasta because it uses quinoa flour. We've already discussed how great quinoa is for you....so you know it is healthy, delicious, light and and very filling! So, if you have a wheat grinder, grind some quinoa and use it. If you don't, find a friend that has a wheat grinder and grind some...it is so good!!!
Quinoa Whole Wheat Pasta (this is my family's favorite...it is a lighter pasta)
1½ C whole wheat flour
½ C quinoa flour (you can grind quinoa in a wheat grinder)
2 eggs
2 T oil
2-4 T water (or as needed)
Note: Use approximately ½ C less flour for hand extruder <>
Tuesday, June 29, 2010
Shipping...
Thanks to my wonderful friend Sara, I now have some estimated shipping prices for my book, Suzie's Sweet Wheat. If you order multiple books, the shipping prices are SUBSTANTIALLY reduced...and it doesn't have to be 20!!! Here they are...thanks Sara...you are AWESOME!!!
1 book $3.61
2 books $4.04 or $2.02 ea.
3 books $4.47 or $1.49 ea.
4 books $4.47 or $1.12 ea.
5 books $4.90 or $.98 ea.
10 books $6.62 or $.62 ea.
20 books $9.62 or $.48 ea.
30 books $13.05 or $.44 ea
The shipping price goes down quite significantly for each book between 1 and 5 and after that the savings are not all that significant.
IT IS FOR SALE!!!
My book arrived and I just put it for sale!!! If you want to order, go to:
https://www.createspace.com/3458548
I have everything from pizza and calzones to pasta recipes, soups, salads, and TONS of desserts, including my famous chocolate cake!!! This book has all of my favorite recipes and is sure to get your family eating whole wheat!!! It is discounted for the first month for $13, so buy today!!! If you get an order of 20 or more, my sister informed me that the shipping price is greatly reduced, so if you have a lot of people interested in learning to cook with whole wheat...get a group and SAVE!!!
Monday, June 28, 2010
Why is Quinoa so Great???

Quinoa has a very high amount of protein and its set of all nine essential amino acids makes it a complete protein. It has a high fiber content and is high in magnesium and iron. For all of you out there who know someone who is gluten-intolerant, it is gluten-free! Surprisingly, quinoa is not actually a grain. It is more closely related to green leafy vegetables like spinach.
Quinoa is very easy to prepare (just like rice) and can be served in any recipe where you would use rice. It is DELICIOUS! So, how do you prepare it?
Bring 1 C quinoa and 2 C water to a boil. Reduce heat and simmer for 15-20 minutes. Really, it's that easy! You can actually mix it with Bulgar wheat, as the picture above shows. The picture shows Mel's Quinoa Fajitas, a recipe in my cookbook. It is my sister-in-law's recipe and it is SO GOOD!
Stay tuned...tomorrow I'm going to give you a recipe that uses quinoa flour...
A Comparison of Stand Mixers


Which one is the one for you???
Electrolux DLX
This product runs for about $570. It has a 600 watt motor. It has an 8 qt. bowl. This is the only mixer, of the three, according to my observations, which contains a timer. This is a nice feature, considering how often I use another timer to time my kneading process. It has many attachments including a meat mincer, vegetable slicer, cheese grater, pasta disks, flake and grain mills, cookie press and blender. This one sounds the most similar to the Bosch in its all-in-one approach to the stand mixer. I’m not sure how much these attachments cost. I did look for them, but couldn’t find individual prices. The speed settings adjust from 45 to 130 rpm…that’s quite a range! The Kitchen Kneads staff says this is an awesome machine and I just had a comment on my blog from a lady who said she LOVES her's. I wish I knew more about it, but for now...I am in the process of learning.
Kitchen Aid
The classic Kitchen Aid mixer can hold about 8 cups of flour, has a 4.5 qt. bowl and runs for around $200. It can make up to 6 dozen cookies or three loaves of bread. It has a 250 watt motor and a 4 ½ qt. stainless steel bowl. For about $300, you can get a mixer with a 300 watt motor. You can purchase the professional series Kitchen-Aid mixer that has a 6 qt. bowl and goes for around $500. This mixer has 575 watts. The Kitchen-Aid mixer comes with a dough hook, whips, and a steel gear transmission.
Kitchen-Aid has quite a few attachments, including a pasta maker that looks very much like a manual pasta maker. It attaches to the front of the mixer and can make spaghetti, linguine, fettuccine, etc. It appears that the pasta attachments and the actual roller are separate and quite expensive on the Kitchen-Aid. For my manual machine, which looks almost identical to the Kitchen-Aid, I spent $77 dollars, and they came together. On the Kitchen-Aid, the roller is about $170 and the different attachments come to about $330. The ravioli maker is another $170. Although it looks so similar to my manual pasta maker, I am sure it works much better. I have never used this pasta maker, so my opinion won’t really count. However, it does, as far as I can tell, lack the capability to make cylindrical pasta, like macaroni, ziti, etc.
Among the many mixer attachments, there is a food grinder (for meats), slicer (for fruits and vegetables) and a strainer. It also offers a grain mill, heavy-duty can opener, sausage stuffer and a citrus juicer. These are all very nice features to have. It also appears to have an attachment for an ice cream maker!!! I may be missing some, but these are the attachments I have found.
The Kitchen-Aid Stand Mixer has a time-tested reputation. These mixers have been around forever and passed down from one generation to the next.
Bosch
The Bosch Universal Plus Mixer can handle up to 26 cups of flour. It has an 800 watt motor. The blender attachment is about $70. The slicer/shredder attachment is about $120 which comes with three attachments and three more are available for sale. You can purchase a food processor as part of the Bosch for about $105. There is a citrus juicer available that attaches directly to the Bosch for only $30. It can juice lemons, oranges, grapefruits and limes. You can purchase a meat grinder/food grinder, which I use for grinding wheat sprouts and works AMAZINGLY well, for about $145. You can buy a fruit and berry press for $100 (this fits on to the meat grinder). You can purchase a cheese grater that works for both hard cheeses and nuts for a little over $30. There is a sausage-stuffer attachment for $50. There is a cookie and pastry press available for $15. The pasta maker is $160 and includes accessories to help you make 11 different types of pasta! However, you do have to purchase the meat grinder in order to use the pasta maker. There is a flaker mill that can turn soft grains into flakes for about $130. There are cookie paddles available for $30. You can also get a stainless-steel bowl for another $70. There is also a Bosch Wheat grinder, which I discussed in a previous blog entry, available for $120-$130.
This is truly an all-in-one kitchen machine!!!
There is a compact Bosch for about $150 that has a 400 watt motor. I don't know how the attachments work with the compact Bosch.
I have the Bosch mixer and I LOVE it! I LOVE making pasta and I make it all the time. I have a whole wheat macaroni and cheese recipe, penne recipes, etc., so I would be lost without the attachments allowing cylindrical pasta. I also have the slicer, the meat grinder and the blender…each of which are AMAZING! I can make smooth, refreshing smoothies with NO ice chunks. It is just one amazing machine! The downside to the Bosch is that I have yet to find any detailed instructions on how to use it.
The Bosch is so large that you need a significant amount of bread dough to knead sufficiently (enough dough for 3 or more loaves). This is perfect for me because I only make bread one time a week and then I freeze the rest and pull it out the day before I need it. If you purchase one, be sure to email me with questions or visit a kitchen supply store for better instructions. I actually took some classes at Kitchen Kneads a couple of years ago to learn to make bread and some more for pasta.
Conclusion: These are all amazing mixers...good luck with your decision!!! Also, if I forgot anything with any of these mixers, tell me and I'll modify this entry. I want people to have the right information and I only have experience with the Bosch. I know people who have each of these mixers and they LOVE them!!!
Saturday, June 26, 2010
This goes for Breakfast, Lunch or Dinner!!!


My family LOVES, LOVES, LOVES, this quiche recipe. It is easy and quick and you can easily make it vegetarian. Begin by making the pie crust and baking it. You can do this earlier in the day. FYI...USE THE BUTTER-FLAVORED CRISCO!!! It is SO much better this way! Also, you may want to omit or reduce the sugar for this recipe in the pie crust...its up to you. You can also boil your wheat berries for about an hour earlier in the day and let them cool so all you have to do is puree them for dinner. Everyone who has tried this quiche loves it and, let's face it, its kind of cool to say that you made quiche..at least I always thought so!
Green Chili Pie
**V**
**L**
1 Whole Wheat Pie Crust
1½ C shredded cheddar cheese
4 oz. can chopped green chilies
4 eggs
½ C sour cream
¼ C pureed wheat berries
¼ C cream cheese, softened (left out at room temperature)
½ C diced ham (if not using ham, you will need to salt to taste and probably add pepper)
2 fresh roma tomatoes chopped
Bake pie crust according to pie crust directions in dessert section of this book. Reduce oven heat to 350 degrees. Sprinkle cheese and green chilies on cooled pie crust. Mix eggs, sour cream, wheat berry puree and cream cheese together. Pour over green chilies. Cover exposed crust with tin foil or metal pie crust cover. Bake for about 20 minutes. Sprinkle diced ham on the outer edges of the pie tin and chopped tomatoes in the middle. Bake for about 40 more minutes or until knife inserted in the middle comes out clean. Mine always takes a good 15-20 minutes longer to bake.
**L** for a lighter recipe, use light sour cream and cream cheese
**V** leave out ham
For the Pie Crust
1 C + 2 T finely ground and sifted whole wheat flour
1 tsp wheat germ (optional)
½ C shortening (substitute part or all with Butter Flavored Crisco to add flavor)
1 T sugar (or to taste)
1 T cold water
1/8 tsp salt (or to taste)
Preheat oven to 450 degrees. Sift whole wheat flour twice. Cut shortening, salt, sugar and wheat germ into flour. Add cold water and mix with hand. Put ball of dough between two large pieces of saran wrap and roll in a circle until about 1/8-¼ in. thick. Pat dough into pie pan, and prick with fork every inch of sides and bottom. Bake for 10 minutes.
If it is a filled pie, bake for 45 minutes to an hour, according to recipe directions. Until pie filling is finished cooking and pie crust is golden brown. You may need to cover the edges of the crust with foil if they appear to be getting overdone.
Note: If making a quiche or dinner recipe with pie crust, you can choose to half the sugar to reduce the sweetness of the crust.
Friday, June 25, 2010
THESE WERE KIND OF FUN...


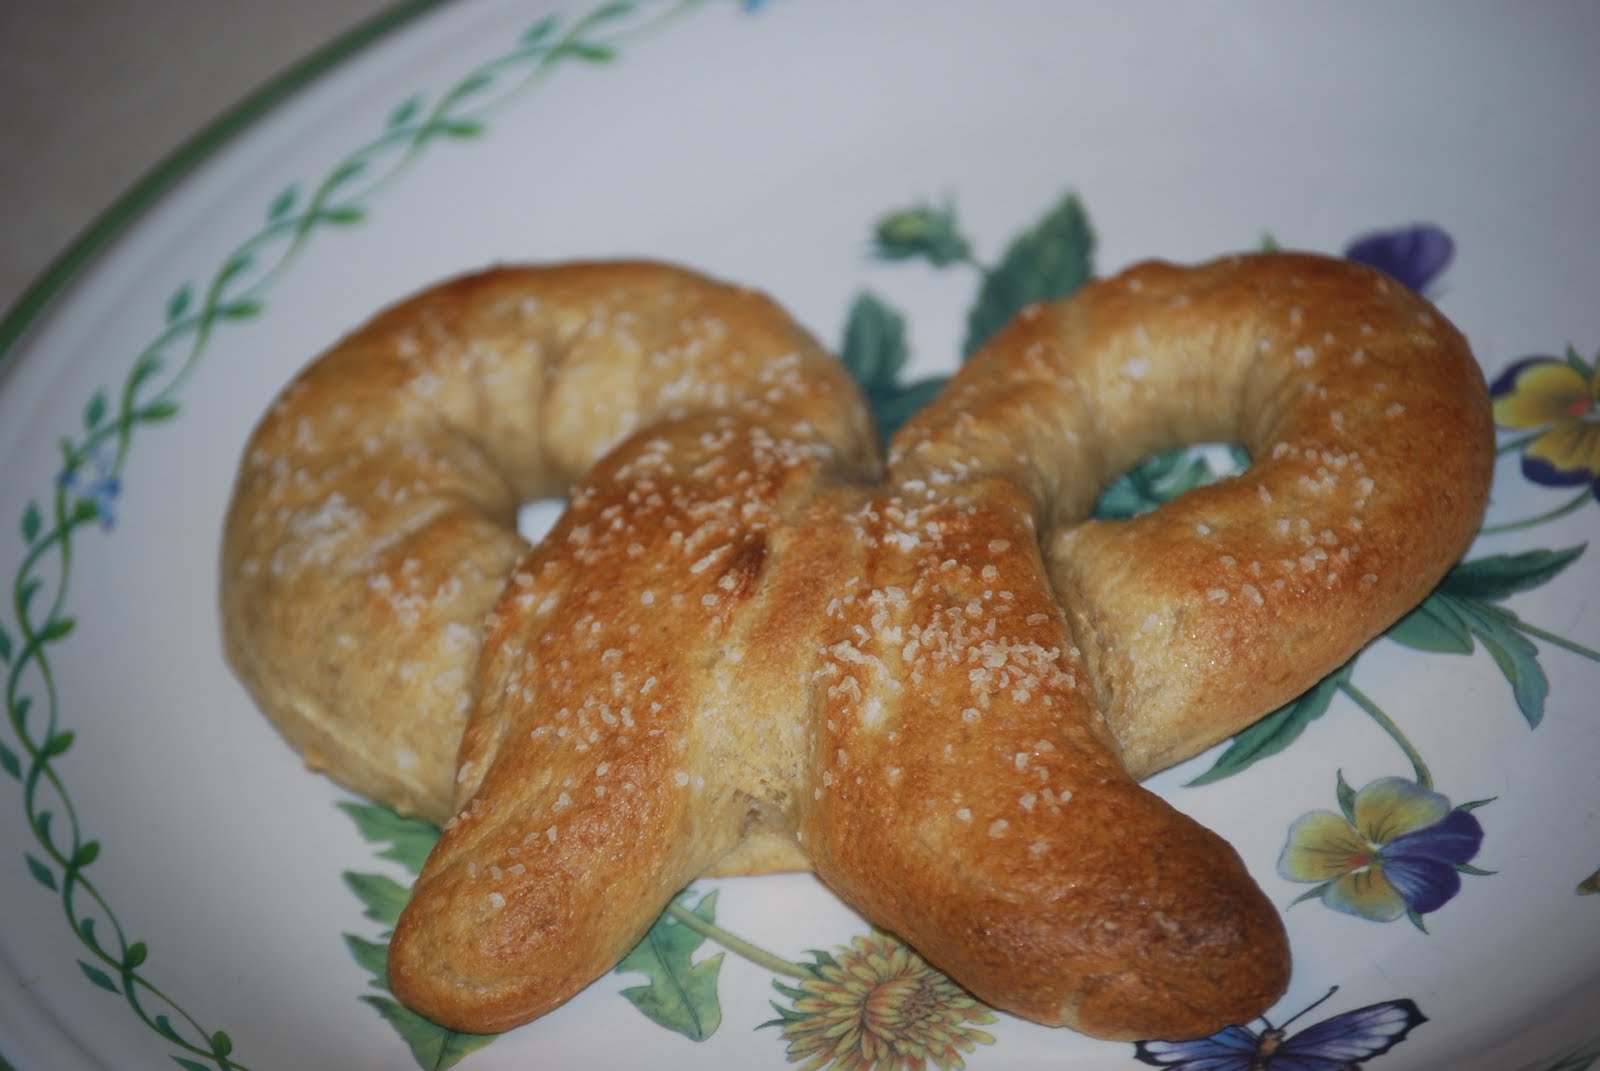
We made these and my kids LOVED them...actually, so did my husband. You have to be careful after boiling that you don't tear them apart and make sure you bake them long enough that you don't have any "doughy" sections. These are definitely best served warm, right after they are baked. Let your kids roll the ropes, shape the pretzels and salt them (but not too much!) They are sure to love this activity!!!
Home-Made Soft Pretzels
2 C warm water
1 T yeast
2 T white sugar
1 T vegetable oil
4½–5½ C whole wheat flour
1 T salt
1 tsp dough enhancer
1 tsp gluten
kosher salt
Pour warm water into mixing bowl. Sprinkle yeast over the water and stir. Let sit for about
five minutes. Add sugar, oil, and about 4 cups of the flour. Sprinkle salt on top of the flour, along with dough enhancer and gluten. Add more flour by ½ C measurements until dough is no longer sticky. Knead for about 15 minutes. Place dough in a greased bowl. Cover bowl with a damp towel and let dough rise for about an hour.
Preheat oven to 500 degrees. Punch down dough and divide into 5-6 segments. Roll into a rope using both hands until the rope is about 20 inches in length. Wrap ends of rope around to make a “bow” shape. Seal each touching segment so that when it rises and is boiled, it doesn’t come apart. Lay pretzels under a damp towel and set a timer for 10-15 minutes. Bring a large pot filled 2/3 of the way with water, to a boil. When the first pretzels have risen for 10-15 minutes, put 2-3 at a time in the boiling water for about 1 minute 15 seconds. Turn the pretzels over and cook for another minute or until they look sufficiently boiled.
Put boiled pretzels on a greased cookie sheet. Sprinkle with kosher salt. Put in oven and bake for 10 minutes or until light golden brown. Watch closely. When top is done, turn pretzel over and cook for 5 minutes until the bottom is light golden brown. Remove from oven and let cool for at least 15 minutes before serving. Serve with buttercream frosting.
Buttercream Frosting:
1 stick of butter
a few cups of powdered sugar (to taste and texture you desire)
1-2 T of milk (or as needed...you want it less like frosting and more like a glaze)
Beat the butter until light and fluffy. Add powdered sugar. Add milk as needed. Beat until fluffy. Serve with HOT pretzels.
Stay tuned...tomorrow I'm going to give you a recipe that is great for breakfast OR dinner! We love it for both!!!
Monday, June 21, 2010
Let's Compare Wheat Grinders...

I decided to do a wheat grinder comparison so that those of you out there that are having difficulty deciding if you really want to spend the money on a wheat grinder, will have an easier time actually deciding on which machine to purchase. It seems to me that each of the following wheat grinders, I've chosen four, can grind the same types of food, with a few variations. This includes all dry grains. I’m unsure about the Bosch, but I believe the rest can grind beans as well, you’ll have to read the manual before using. None of them can grind oily foods like flax. They can each grind from fine to coarse flour. There are a few distinguishing characteristics of each one. I’m going to try to highlight just the differences of each one to make your choice between them a little easier.
The WonderMill claims to be the quietest and fastest flour mill available. The WonderMill is extremely easy to use. The WonderMill is UL (for USA), CSA (for Canada), and CE (for Europe and UK) certified and is apparently the only machine that has passed the testing to receive these certifications. The WonderMill allows you to grind over 100 pounds of flour in an hour. It has a 1250 watt motor. The cost of a WonderMill ranges from $240-$280. I personally have a WonderMill and I LOVE it. It works so well and grinds SO FAST! The only drawback is that you do HAVE to have it on if there is wheat in the hopper, or it will jam up and require service. I grind beans, corn, every kind of grain including millet and quinoa…I LOVE this mill!
The Nutrimill apparently has the broadest spectrum of texture settings. It can grind flour finer than any other wheat grinder. Nutrimill claims to have a 400% adjustment range for flour texture, which is apparently 10 times greater than other wheat grinders. Nutrimill also has the largest hopper, allowing you to grind 20 cups of flour at one time!!! I can grind about 8 in my WonderMill. Apparently the Nutrimill also operates without creating dust all over your kitchen.
One big plus of the Nutrimill is that you can put grain in before you turn it on and if it happens to come unplugged while milling, it will restart without any problems. Most wheat grinders will jam up if you do not turn it on first and if they come unplugged while milling, will jam up and need to be serviced…I know this personally! The Nutrimill ranges from $240-$300. I have never used a Nutrimill, but I know it is supposed to be a great machine.
Blendtec, or the K-Tec Kitchen Mill can grind 90 pounds of wheat in an hour. It is a smaller flour mill, making it easier to store, and yet has great grinding capabilities. This is a great little wheat grinder that is also easier on the budget. I have a friend that has the wheat grinder and she LOVES it. This one is much cheaper ranging from about $180- $205.
The Bosch wheat grinder attachment can fit all Bosch stand mixers (with model numbers beginning with MUM 4)…making it an all-in-one machine. I’m going to focus on the grain grinder with the steel cones. It is the most economical of all of the wheat grinders, ranging from $120-$130. If you already have a Bosch mixer and you are worried about the cost of a wheat grinder, this may be the one for you. I have a friend that has this one, too, and she says it works GREAT!
What is Soft White Wheat?
Soft white wheat has less protein than hard white wheat. Therefore, it is better for pastries, cakes, cookies, etc. Hard white wheat is better for breads. I'll have you know, though, that I use hard white wheat for all of my baking. I simply use the finest setting for cakes, cookies and pastries. But...if you want it even lighter...try the soft white wheat!
What do I do with pureed wheat berries...

Well, for one thing...you can put them in smoothies and boy oh boy do I have some yummy smoothie recipes!!! The puree makes them creamier, smoother and HEALTHIER! Are they high in vitamins, YES. Are they low fat...YES! Are they high in sugar...yes...unfortunately. Are they high in fiber YES! So, if you make them this way, they are better for a dessert. To make them healthier, add more fruit and omit the sherbet.
One big tip...before you make the smoothies, even if you buy the fruit fresh, FREEZE THE FRUIT! It is SO much better than adding ice.
The picture is of Christian's Orange Zing and it is wonderful! I'm actually going to give you a recipe that I demonstrated for a bunch of women I know. They loved it and so will you!!!
Fantastic Raspberry-Orange
1½-2 C raspberry juice (can use plain raspberry juice or any raspberry juice blend...I like the white grape/raspberry blend)
1 banana
1 C orange sherbet
1 C raspberry sherbet
1 C strawberries
1 C raspberries
½ C wheat berry puree
ice to desired consistency.
Add all ingredients and blend until smooth.
Pureed Wheat Berries???


Really...pureed wheat berries? This is a technique I had never heard of, but had to try with my family and it WORKED! Because of the nutritional value of wheat berries, I thought I needed to try to give them to my kids. However, although my kids are great at eating wheat berries in soups with corn, where there is no texture difference, trying to throw them in other foods was not acceptable to my kids.
So...I tried this and it worked GREAT! I now can put pureed wheat berries in smoothies, creamy soups, cheesy casseroles and just about everything else! Why would you do this??? Because high-fiber diets are being recommended by every health professional out there!!! Why not add "natural" fiber and protein to everything your family is eating???
• Pureed wheat berries:
Cook wheat berries until they split, or are very large and soft. The softer they are, the less you will notice the texture. Use approximately 1:1 ratio of wheat berries to water and blend in blender or food processor. This is a great alternative for those who dislike the taste and texture of wheat berries. It is tasteless and there is no texture difference. These are great for creamy soups, smoothies, creamy sauces and other areas where texture would be noticed and unappreciated. Store in an airtight container in the refrigerator. This is good for up to six days and can be tossed in any recipe you want!
Wednesday, June 16, 2010
You Know How Much I Love a Hot Breakfast!

This one should please the whole family!!!
French Toast Casserole
**V**
6 C whole wheat bread cubes
4 eggs
1½ C milk
2 T brown sugar
1½ tsp vanilla extract
1 T butter
½ tsp cinnamon
1 T white sugar
Preheat oven to 350 degrees. Grease a 9X9 square pan. Put bread cubes on bottom of pan. Beat eggs, milk, brown sugar, and vanilla. Pour this mixture over bread. Cut butter into tiny pieces and sprinkle around the mixture. Let casserole set for 10 minutes. Mix white sugar and cinnamon and sprinkle all over the casserole. Bake for about 45 minutes or until golden brown. (Check with toothpick inserted in middle to see if egg is done) Serves about six
people.
FYI...I have submitted the final copy and am waiting to receive what I hope is my final proof of my book. It should be here next week and then the book will be available. Have a great weekend!!! Next week, we'll be focusing on a little wheat technique that makes it really easy to add wheat to ALMOST everything...
Living Necklaces...


Corny, I know, but my kids thought they were really cool. It really wasn't my idea, my oldest did this at a farm and she watched it grow every day. So, at home, we made "living necklaces" with my kids and the neighbor kids and they thought they were pretty neat.
All you do is buy cheap sandwich baggies (I got them at the dollar store). Cut a large triangle that includes one of the corners. Put a few drops of water on a cotton ball (enough to make it slightly damp). Put 1-2 kernals of wheat and the damp cotton ball in the corner of the triangle. Tie the necklace off with some pretty ribbon (I also got mine at the dollar store). Use some rope or ribbon and tie it around the ribbon and then in a big loop to go around your child’s neck. Now, for the next few days, they can watch the wheat sprout...my kids thought it was pretty cool.
All you do is buy cheap sandwich baggies (I got them at the dollar store). Cut a large triangle that includes one of the corners. Put a few drops of water on a cotton ball (enough to make it slightly damp). Put 1-2 kernals of wheat and the damp cotton ball in the corner of the triangle. Tie the necklace off with some pretty ribbon (I also got mine at the dollar store). Use some rope or ribbon and tie it around the ribbon and then in a big loop to go around your child’s neck. Now, for the next few days, they can watch the wheat sprout...my kids thought it was pretty cool.
Check out tomorrow's post for a fun breakfast...here is what you need:
5-6 pieces of whole wheat bread
4 eggs
milk
brown sugar
vanilla
butter
cinnamon
white sugar
mmmmmm.......
Just a note: my sister-in-law made the Whole Wheat Barley Flax Pancakes and realized she didn't have any eggs or milk. So...she improvised and used egg replacement (Ener-G) and soy milk and she said they were great! Why is this so great...because they are both able to be stored at room temperature. You can store them and then have all the ingredients whenever you want to make the pancakes!!! Way to go Mel!!!
Look What I Found at the Dollar Store

So, I went to our dollar store the other day and I found a few items that were really helpful to me in my wheat adventures. I'm assuming most dollar stores carry similar items since the ones around me all do. I found a pack of two wire mesh strainers (perfect for sifting powder from wheat in cracked wheat and Bulgar wheat). I'm guessing they all carry these in their cooking equipment because I bought them 10 years ago at a dollar store. I found 2 growing trays in a pack for growing my wheatgrass. I also found a pack of two cooling racks...perfect for cooling your bread on. Oh, a little tip, remove your bread from the pans and let them cool on a cooling rack because the bread will sweat wherever it is in contact with something and it can get a little gooey. So, about 5 or so minutes after it is finished baking, remove it from the pan and let it cool on one of these super cheap cooling racks. They are flat and store easily!!!
Monday, June 14, 2010
Coconut Chicken Curry over Bulgar Wheat

Coconut Chicken Curry
(CR)
2 T vegetable oil
5 boneless skinless chicken breasts
3 medium potatoes
¼ C dehydrated minced onion (rehydrated with water)
1-14 to16 oz. can coconut milk
¼ C wheat berry puree
3 T sugar (can add 1 T more or a little less if you want it less sweet!)
1½ -2 tsp salt
¼ tsp black pepper
1½ tsp curry powder
1 C chicken broth
2 C frozen peas
¼ tsp cayenne pepper (or less if you want it less spicy)
brown rice or 2 C cooked Bulgar wheat (Instructions are in the front of this book)
Brown chicken breasts in oil on both sides. Peel and chop potatoes and rehydrate onions by placing in water for about 15 minutes. Add potatoes to crockpot. Put chicken breasts on top of potatoes. Mix rehydrated onions, coconut milk, salt, sugar, pepper, curry powder, wheat berry puree and chicken broth. Pour sauce over chicken in crockpot. Cook on low for 6-8 hours, or until chicken is no longer pink and juices run clear. About 20 minutes before serving, add peas to crockpot. Serve over brown rice or Bulgar wheat.
Now what???

So, we have our cracked Bulgar, now what??? It's pretty easy from here...
To Cook Bulgar:
• Mix 1 C Bulgar wheat and 2½ C boiling water
• Turn heat to low, cover and let simmer for about 10-15 minutes, stirring occasionally –watch closely and add more water if needed.
• For a drier Bulgar consistency, cook longer, to remove more of the liquid. To replace couscous, crack the Bulgar finer, strain powder, and cook longer, then fluff with a fork.
Stay tuned...tomorrow I'll give you a recipe to match the picture above...
Bulgar Wheat...what is it and how do I make it?


I initially thought Bulgar wheat was actually a type of wheat, but it is actually a way that wheat is prepared. It is very simple, and very similar to cracked wheat. I usually substitute Bulgar wheat for rice, although brown rice is very nutritional as well. Some people HATE brown rice and for those people, or for those who want to try something new, or for those of you who know what Bulgar is and really like it...this is for you!
How to make Bulgar Wheat:
• Boil whole wheat kernals (about a cup) for 45 minutes to an hour or until they are plump (picture 1)
• Drain water and sprinkle evenly over a cookie sheet and heat oven to 175 to 200 degrees
• Put in oven for several hours until wheat is completely dry - I do this overnight (picture 2 shows the dried Bulgar wheat)
• Crack in a blender or food processor. You can crack it to your desired size. If you have a lot of ground wheat powder after cracking, you can use a wire mesh strainer to strain it. (picture 3 is sifting the Bulgar and picture 4 is the final product)
Tomorrow, after your Bulgar is completely dry, I'll tell you how to cook it. For now, if you do this early, store it in an airtight container and wait until tomorrow. For those of you looking at this later in the day, boil the wheat and let it dry in the oven overnight...I always do it this way...then crack it in the morning.
Oh...FYI...you can find the mesh strainers at the Dollar Store...at least out here you can...
Saturday, June 12, 2010
Here's What WE had for Breakfast!!!

It was so yummy...my family LOVED it!!!
Cinnamon-Streusel Coffee Cake
½ C butter
½ C sugar
1 egg
1 egg yolk
1¾ C + 2 T finely ground, sifted whole wheat flour, (if freshly ground, no need to sift)
2 tsp baking powder
½ tsp salt
2/3 C milk
½ tsp vanilla extract
Streusel
½ C brown sugar
2 tsp cinnamon
2 T melted butter
Preheat oven to 350 degrees. Whip butter and sugar together for 1½ minutes. Add egg, egg yolk and vanilla and mix for 1 minute. Mix together dry ingredients (flour, baking powder and salt). Add dry ingredients to butter/sugar mixture and add milk. Beat for 1 minute. Pour into greased 9X9 pan. Mix streusel together and top cake with streusel. Bake for 20-25 minutes.
FYI...this is NOT in my book...if you like it, you better copy it!!!
Friday, June 11, 2010
Fun for the Whole Family Involving Whole Wheat!!!


Note: Check the blogging schedule change at the bottom of the post...
My friend Tifani inspired this fun activity involving whole wheat. I bet you didn't know you could use whole wheat for your family fun.
I designate one day a week to making my five loaves of bread for the week. Today was bread-making day. Now, how do I have my bread day AND make it a fun day that involves my kids. First of all, if you have a wheat grinder...you will be amazed how much your kids love to put the wheat in, watch it disappear and then check the amount of flour it creates. My little three-year-old has been doing this for over a year and LOVES it. Then, you can let them help you add ingredients. Mix up your bread and then, as my friend Tifani did, let them knead the crud out of it! You will knead after they do...they will probably tire quickly...its kind of hard work. While the bread rises...do something else. Then bake it. While our bread was baking, we used whipping cream and put it into baby food jars. Then, the kids shook it until it got really thick. Eventually, it will separate, like the second picture, and you will have butter and leftover liquid. Pour out the liquid and you will be left with what looks like the first picture...your butter! Salt the butter and let the kids spread it on their hot bread (the third picture). My kids thought this was the greatest thing since sliced bread! Thanks Tifani for all of your wonderful ideas!!!
P.S. Sorry about not getting to Bulgar this week. We'll start making Bulgar wheat on Monday...it is a 2-day process, but all you need is wheat, so there is no real prep.
I've decided to post on Saturdays, but not Sundays...so, I'll see you tomorrow!!!
Wednesday, June 9, 2010
How do I juice my wheatgrass?


With a wheatgrass juicer. I believe you can also juice soft fruits and veggies with it, too, but you'll have to read the manual for the one you use. I've already told you about the benefits of wheatgrass juice, so we won't go into all that. Suffice it to say, I will be juicing wheatgrass and giving it to my kids...I'm sure they'll love it!!! (LOL)
So, juicing wheatgrass... First, you need to grow it out until it is at least 4-5 inches long...it will look like long grass. You also need a considerable amount because you get very little juice out of the grass. I usually sprout 2 C of wheat. I put a layer of soil on a growing tray, sprinkle the sprouts and then cover them with more soil. I water 2-3 times a day so it stays moist and then each day, just wait for a little more green to appear. Eventually, I cut it (I use kitchen shears). Put it in the funnel of the wheatgrass juicer and turn the crank (if you have a manual juicer). Catch the juice in a container and drink it!!! You can also disguise it in a smoothie...which I think is the route we'll have to go to get my kids to drink it...
Wheatgrass juicers range from a low end of $35-$40 to thousands of dollars. If you are interested, search the internet and you can find one!!! Good luck and happy juicing!!!
P.S. One of my old family friends was saying how he hated wheatgrass as a kid, but that they never got sick as kids. There were six of them. He said if they did get something it was gone in two days, tops. He said he still doesn't get sick. He said, and I quote, "So, maybe there is something to the thick green liquid that tastes like my front lawn." I thought that was pretty funny...and informative!!!
Tuesday, June 8, 2010
Did you know...you can use cracked wheat to...

Stretch your meat!!! Adding cracked wheat adds all the vitamins and fiber in the wheat and also bulks your meat, so you can use less and eat more! The cracked wheat, when cooked with the beef, will absorb the flavor of the ground beef and you won't know it is there! Brown ground beef and drain off the grease. Add 2-3 cups of water and boil for 20-30 minutes until wheat is soft and water is evaporated. Then add your seasonings...no one will know it is there!!! Try this recipe out if you don't believe me!!!
South of the Border Tacos Plus
Make Taco Seasoning from this book or use a prepared packet
1 lb. ground beef
½ C cracked wheat
2-3 C water
whole wheat tortillas
Brown ground beef. Drain off grease. Add water and cracked wheat. Bring to a boil, reduce heat and simmer for about 20-30 minutes until wheat is no longer hard or crunchy and water is evaporated. Add 2 T. taco seasoning and ¾ C water and cook until it thickens and water is evaporated. Serve rolled up in whole wheat tortillas.
Variation: Bean and Meat Enchiladas:
Add refried beans to the cooked ground beef/taco mixture. Spoon into a flour tortilla and top with olives and 1 T cheddar cheese. Fold enchiladas and top with sauce and cheese. Cover and bake for 30 minutes.
Sauce:
2 C sour cream,
1 can cream of chicken
1 small can green chilies.
Monday, June 7, 2010
Try this out tomorrow morning...its quick, easy and couldn't be healthier!!!

This is sure to be one of the healthiest, cheapest cereals you have ever had...and it tastes great, too!!!
Cracked Wheat Cereal
**V**
(CR)
Spray crockpot lightly with oil. Add 4 C water and 1 C cracked wheat (follow instructions in the front of the book). Cook on high for one hour and then decrease to “keep warm” for the rest of the night. You will wake up to fabulous cracked wheat cereal! You can sweeten it to fit your individual taste.
Note: You can also cook the cracked wheat cereal on the stove, but it is not as creamy as the crockpot. To cook it on the stove bring 3-4 C water and 1 C cracked wheat to a boil. Reduce heat and simmer for 20-30 minutes. Watch closely and add more water if needed. It is done when the wheat is soft. This will make about 3 servings.
Add your favorite mix-ins (berries, maple syrup, etc.) sweeten as you like and you are done. Thought oats were the only hot breakfast around...think again! You'll love what this little cereal can do for your budget!!!
Why is Cracked Wheat So Great???


First of all, you don't need a wheat grinder to crack wheat or cook with it. Second, it takes only seconds to prepare. Third, you get all the health benefits of the wheat. Fourth, you can use it in SO MANY WAYS!!!
So, how do you crack it...it doesn't get much easier than this.
Preparation of Cracked Wheat
• Cracked wheat is easily prepared by putting whole wheat kernals in a food processor or blender and turning it on to “crack” the wheat. You can make it finer by “cracking” it longer. If you have too much ground wheat powder, you can use a wire mesh strainer to get rid of some of the powder.
• Some wheat grinders will crack wheat for you.
I know, I know...that was tough, right???
So, what do you do with it???
The easiest thing is to make the cheapest, healthiest breakfast you've ever had. Stay tuned!!!
Keep that cracked wheat ready to use tomorrow!!!
Sunday, June 6, 2010
A White Flour Weekend led to this High Fiber, Whole Grain Breakfast

Please read the note about my new blog schedule at the end of this post...
We had a weekend that was full of barbecues, brownies, cupcakes, pizza...in other words, lots of white flour. Because I didn't make the food, I had no control over whether or not it was cooked with whole wheat. This does not work so well for my kids. Let's just say they had a few "issues" and actually said, "Mom, we need more whole wheat." I'm not kidding about that either. Knowing they were having some problems...I decided to throw some flax into their breakfast. Since 2 T of ground flax has 4 grams of fiber...I used 1/4 C in the pancakes AND sprinkled a little on top...which allowed them to receive the benefits of FRESH flax, without knowing it was there. Anyway, I know this is another pancake recipe, but I really LOVE to start my kids out with a healthy, high-fiber breakfast. This week, I'm going to teach you how to make Bulgar wheat and another little trick Iuse that allows me to add wheat to almost anything...oh, if you don't have barley, you can use all whole wheat. These have very little oil because the flaxseed is very oily. Remember...it has omega 3 fatty acids...we love flax!!!
Whole Wheat, Barley, Flax Pancakes
1 ¼-1 ½ C whole wheat/barley blend (grind 1 C wheat and ¾ C barley together to make blend)
¼ C ground flax
1 T baking powder
½ tsp. salt
3 T brown sugar
1 T oil
1 ¼ C milk (soy milk works, too)
2 eggs, separated (or you can use egg replacement)
Make barley/wheat blend. Add 1 ¼ C blended flour (if you want thin pancakes) and 1 ½ C blended flour if you want thicker pancakes. We like them a little thickher. Grind flax in a coffee grinder. Add ¼ C to the flour, reserve any leftover flax for later. Add baking powder and salt and stir. In a separate bowl, mix brown sugar, oil and milk. Separate eggs and add yolks to wet ingredients and put whites in a separate bowl. Beat the whites to soft peaks. Mix wet ingredients (yolks, oil, milk and sugar). Stir wet ingredients into dry ingredients. Fold in beaten egg whites. Bake on a greased, hot griddle. Makes about 12 pancakes.
Note: I like to put a little bit of syrup on the pancakes, and then sprinkle leftover flax on the pancakes. This gives you fresh flax and allows it to stick on the surface of the pancake. For my kids, I then put a little more syrup on top and cut the pancakes…they LOVE these!!! They ate ALL TWELVE PANCAKES...and they are LITTLE kids...not teenagers!!!
By the way, this will be my last post on a weekend. From now on, I will be taking off on Saturday and Sunday and will continue blogging Monday through Friday. Although I love blogging, it has started to feel a bit like a job and I believe that Sunday is a day of rest, so I no longer feel right about blogging on Sunday. So, from now on, we can all take the weekend off and start fresh for another week of whole grain baking!!!
Saturday, June 5, 2010
Grandma Patty's Gooey Chocolate Chip Cookies with hints...

My sister informed me that I placed the chocolate chip cookie recipe in a spot that is difficult to find. So, here it is again...with some hints.
1. First of all, if you have a baking stone, USE IT! Stones make the best cookies, flat out. If you don't and you would like one you can find them at kitchen supply stores or online. If, however, you don't want to purchase one, that is fine, too. I just like the texture a little better when cookies are cooked on a stone.
2. The next tip is to bake your cookies until they are just barely firm...I usually bake them for 10-11 minutes and pull them out. Leave them on the cookie sheet for about 15-20 minutes. This will slowly bake them and allow them to cool before transferring. These cookies are SO good!!!
3. Either grind your flour fresh or SIFT it!!! This makes a HUGE difference...if you don't they will be heavier, puffier and not nearly as good!!!
4. Beat the wet ingredients for the stated amount of time.
5. USE WHITE WHEAT!!! If you have it, white wheat works MUCH better for cookies...I MUCH prefer it!!!!
Grandma Patty’s Gooey Chocolate Chip Cookies
3 ½ C sifted or freshly ground whole wheat flour
¾ tsp baking soda
1 tsp salt
1 C butter, softened
1 C packed brown sugar
¾ C white sugar
1 T vanilla extract
2 eggs
1 ½ C semisweet chocolate chips
Preheat oven to 350 degrees. Cream sugars and butter together. Add vanilla extract and eggs. Beat for three minutes. Mix flour, baking soda and salt. Stir dry ingredients into wet ingredients. Stir in chocolate chips. Drop by heaping teaspoonfuls onto ungreased cookie sheets. Bake 10-12 minutes. Let cool before transferring. Makes 3-4 dozen, depending on the size of the cookies. The trick is to take them out when they are just barely solid and let them sit on the hot cookie sheet…this will cook them just a little longer. YUM!!!! Remember, if you prefer a dietetic cookie, follow the directions for Grandma Patty's Dietetic Chocolate Chip Cookies.
P.S. I have another whole wheat chocolate chip cookie recipe that I have on good authority is amazing. I haven't had a chance to try it yet...but I sure am optimistic!!!
Friday, June 4, 2010
A Tip for your Bread Dough
Ever find that your dough starts to dry out while it is rising. You may find that you are trying to knead the dry surface into the moist parts of the dough. To avoid this problem, use a damp towel to cover your dough when it is rising. This will keep it nice and moist!
By the way, I realized I didn't attach a picture of the cookies. Tomorrow, I will make them again and attach the recipe again and the picture. My sister informed me that the picture recipe is in a bit of an odd spot...after sprouting wheat. I am going to put it in a more obvious post tomorrow, along with a picture of the cookies.
Have you ever wondered what Bulgar wheat is??? I'll teach you how to make Bulgar coming up!!! Also, for those of you growing wheatgrass...I'll show you a grinder I use and how to grind it. Stay tuned!!!
Thursday, June 3, 2010
For Those of You Watching Your Sugar and Fat Intake
Looking for a Dietetic cookie? You can easily adjust the Grandma Patty’s Gooey Chocolate Chip Cookie recipe in the following ways to make this much friendlier to those with Diabetes, or anyone else watching their sugar and fat intake.
Grandma Patty's Dietetic Chocolate Chip Cookies
1 C butter (SMART)
¾ C stevia or splenda
1 C brown sugar
2 eggs
1 T vanilla
3 ½ C whole wheat flour
1 tsp. salt
¾ tsp. baking soda
1 ½ C chocolate chips
Preheat oven to 350 degrees. Cream sugars and butter together. Add vanilla extract and eggs. Beat for three minutes. Mix flour, baking soda and salt. Stir dry ingredients into wet ingredients. Stir in chocolate chips. Drop by heaping teaspoonfuls onto ungreased cookie sheets. Bake 10-12 minutes. Let cool before transferring. Makes 3-4 dozen, depending on the size of the cookies. Believe it or not...these are really good!!!
White Wheat Vs. Red Wheat

There is a lot of controversy in this area...most people tend to believe that red wheat is healthier than white wheat, when in fact experts have concluded that nutritionally they are equivalent. When compared on the USDA website, there are slight, and I do mean slight, differences between the two. The main difference is that white wheat has had certain phenolic compounds in the bran removed. This gives it the “white” color and also removes some of the strong flavor of the red wheat. I MUCH prefer baking cookies and cakes with hard white wheat. Many people prefer soft white wheat for cakes, I’ll cover that soon. I use hard white wheat and have great results. I do use red wheat, too, just not for desserts...you can, but they will definitely have more of a "wheat" taste to them.
Wednesday, June 2, 2010
NOW WHAT???


Here are instructions for growing wheatgrass...if you have NO interest in learning to do this, below you will find a great recipe for sprouted wheat muffins!!!
How to Grow Wheatgrass
How to Grow Wheatgrass
If your goal is to make wheatgrass, begin by sprouting wheat. Put soil in a seed tray and sprinkle sprouted wheat all over the soil. Cover with a bit more soil to cover the sprouted wheat. Store in indirect sunlight, making sure to lightly spray the wheat with a water bottle daily. Keep growing for about a week and then cut the grass and juice it to attain wheatgrass juice. Wheatgrass molds pretty easily and grows bacteria. Always be careful when eating it. To be safe, you can purchase wheatgrass in health-food stores.
Tip: If you keep your wheat less dense (decrease the amount you are growing) and DO NOT get it too wet, you can decrease the chance of mold. A slow-moving oscillating fan directed at the wheat will also help keep the seeds from getting too wet and will inhibit the growth of mold. You CANNOT use soft white wheat for this...ONLY hard wheat will work!
Delicious Sprouted Wheat Muffins
1 egg
¼ C applesauce
¼ C oil
2/3 C sugar
½ C ground wheat sprouts
1 T baking powder
1 ½ C freshly ground or sifted whole wheat flour
1 tsp cinnamon
½ tsp allspice
¼ tsp salt
Preheat oven to 400 degrees. Grind your wheat sprouts in a food processor until sticky and uniform in texture. Mix together egg, applesauce, oil, sugar and ground wheat sprouts for about 30 seconds. Sift whole wheat flour and baking powder together. Add flour mixture to wet ingredients. Add spices and salt and mix until thoroughly combined. Pour into greased muffin tin and bake for 14-16 minutes. Eat warm with butter…they are so good and your family will have no idea there are wheat sprouts in them! Makes 12 large muffins.
Tuesday, June 1, 2010
Success!!!

You did it! Your sprouts should now be about the size of the grain. If they aren't do one more rinse and drain and wait another 8-12 hours. Now... what to do with the sprouts...stay tuned for my Sprouted wheat muffin recipe!!!
Step 4 of Sprouting Wheat

Can you see the beginning of sprouts? You should! We are almost there. Now, just rinse with lukewarm water again, tip again to drain and put in a dark place again. Now, let's wait another 8-12 hours! Isn't this so easy???
Note: check below...I made a change to the cookies...be SURE to use either freshly ground whole wheat or sift your whole wheat flour or you will have too much. This is VERY important!!!
Subscribe to:
Posts (Atom)


